If you’ve done everything you can, and you still need more juice, dual batteries are the way to go. Really think it through, because it ain’t cheap. Not everyone NEEDS dual batteries, so I hope this article helps you think it through. I will be covering the install as related to "Big Blue", the Flatwater Overland 1995 Jeep Wrangler YJ. If you need more technical or fundamental information on heavy duty electrical systems for your 4x4, see the rest of this Electrical Charging blog for more.
What you need: The good news is, this is a project that can be done in a day if you have all your components ready to go. A general list of parts is below. The install on your particular rig may need different or more components.
Battery tray: Obviously, you need to be able to secure an extra battery on your rig. There are as many ways to do this as there are models of 4x4s. I suggest buying a high quality tray unless you are a fabricating master. In that case, you wouldn’t be reading this. I purchased mine from Tomken, but it needed a little tweeking. The said tray, whoever built it, will obviously displace other items wherever it sits, so take that into consideration. More on that later.
Batteries: Show me the money! If you are going through with this project, don’t buy lead-acid batteries, whatever you do. The initial cost savings isn’t worth it in the long run, and it kind of goes against the spirit of the project. This one battery expense can end up running you several hundred dollars. Get some good sealed batteries such as Optimas, Odysseys, or similar. At least one of them being a deep cycle or marine grade battery is a good plan. AGM (absorbed glass mat) batteries are the most durable type for 4x4s and come from a few different manufacturers and many different styles. One characteristic of note with AGMs are that they produce very limited corrosion on the battery posts to the extent that you may never notice it at all.
Battery post clamps: Thrifty or spendy, get versatile ones. The best types have a mechanical connection for the cables. Military grade units are made of lead and have studs or bolts on which you attach your primary cables that have lugs. Most self-respecting car stereo shops will carry high end clamps with covers from different manufacturers. Keep in mind you probably won’t be able to reuse the factory primary cables and post clamps.
Cable: You’re gonna need more primary cable. Use nothing smaller than #4 gauge. “0” is best. Make sure you also pick up heat shrink tubing to protect any soldered lug connections you make on the cables. Did I mention to get correctly sized lugs for the cable? This can be purchased at aforementioned car stereo shop, a good parts store, or a welding supply house.
Battery isolator: OK, I’ll be honest. This is something that can get REALLY pricey if done right. But, it is not a 100% necessity- depending on what you expect your electrical system to do. There’s lots of ways to do this. I would suggest purchasing a prepackaged controller with solenoids and associated components if you think you need to isolate/combine/control multiple batteries at will. There really is a better way, though. Most of us only need to isolate, if that. I would highly recommend a Power Gate from Perfectswitch for this task. To be truthful, I would personally not consider the old school solenoid and isolator route with the new technology available from Perfectswitch. I will only cover the install of my Power Gate for the sake of this article.
Other sundries: You will probably be rerouting wiring and cables in this project, so have some wire loom around to help protect stuff. Also have a small stockpile of wire connectors and small gauge wire in case you need to do said relocating or extending. Please, please use soldered connectors and then weatherproof the connection. Just say no to spaghetti wiring! The obligatory wire tape, heat shrink, solder, zip ties, flux, minitorch, etc. should also be at hand.
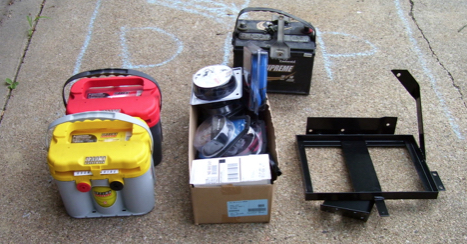
Everything must go! When it’s time to fire sale your old battery setup, save the stuff for a while. Trust me. This part should go fairly quickly.
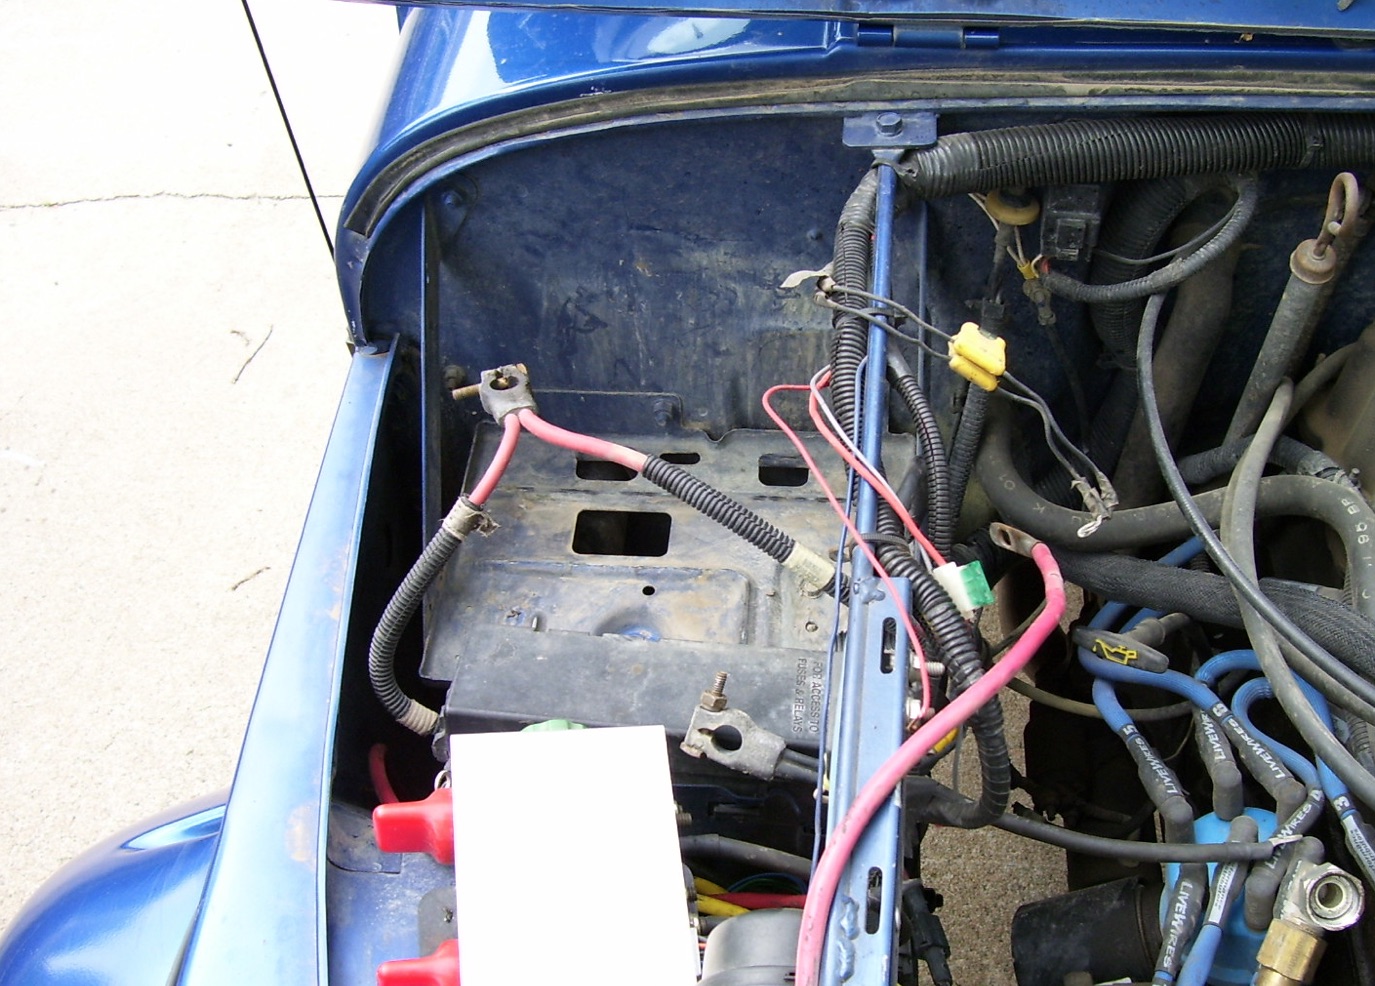
Battery removed and ready to begin project
- Disconnect the battery clamps and set aside.
- Remove the battery hold-down bracket.
- Lift the original battery up and set aside.
- Remove the factory battery tray (this step required me to slide the power distribution box out of its bracket. It will be reattached to the new tray later in a slightly different location)
- Rack ‘em up! Once everything is removed, it’s time to install your new battery tray system. The Tomken tray that I purchased attaches to the factory bracket mounts for simplicity. The side-by-side arrangement of the batteries necessitated moving the factory power distribution box to the inboard side of the new tray reusing its original mounting bracket.
Well, the fit on this step wasn’t perfect. It required some creative drill and hammer use to get the mounting points to line up to the Jeep. I won’t be too quick to blame Tomken since Blue has been on its side a time or two. Also, reattachment of the distribution box didn’t line up like I expected. I wasn’t able to use all the mounting holes without redrilling all but one. There was even one firewall stud that I was unable to get a nut onto. The tray is more than secure, but it still bothers me.

Tomken tray installed and ready for batteries and wiring clean-up
- Test Fit Now it gets exciting! Drop in your shiny new batteries and marvel at the power. Determine which orientation of the posts will do you the most good. Now start laying the existing cables and connections to discover what will work and what won’t. Just like I mentioned before, you will probably have to make a few new cables. I waited for the dual batteries to fix some spaghetti wiring that plagued Blue. I also made some new primary cables, but the starter cables actually fit to the main battery. The prior installation of my Mobi Arc onboard welder fixed a few other wiring issues earlier such as the alternator to battery cable and some ground cables. These will be reused with the dual batteries. I would suggest running #4 cable from your alternator positive post to the battery and the primary distribution box of your Wrangler.
- This is where you figure out where to put your isolation devices if you use them. I recommend you do use something. It was super easy for me since I used a Perfectswitch MOSFET isolator in the initial installation. The unit is very compact and easily fit above the batteries on the firewall. A solenoid and/or finned isolator would have been a challenge to safely mount near the batteries. My Perfectswitch isolator can handle 300 amps and is smaller than a slice of Wonder bread. It has more than enough MOSFET capacity for my 136 amp alternator. This isolator will keep my secondary deep cycle battery from draining my main battery when winching or putting around on the trail all day. Most of my high drain accessories will be powered by the deep cycle. Note: I am no longer using the isolator and am simply using the batteries in parallel. I found this was the best solution for me. I will likely be installing an IBS battery controller once the "Lakota" trailer is ready in order to charge and control it's remote battery.
This final step proved to be the most time consuming since I wanted to make sure all my new and old wiring was routed properly and didn’t create any rub or pinch points. Soldering lugs onto new cables also took some time, but I was glad I sprung for the JL audio battery post clamps. They provide quality mechanical connections for the cables and were a big time saver. They also are easy to deal with when you need to change cabling or maintain the system.
The Power and the Glory
So, how did it work out? So well that it was transparent. What I mean is that the system gave me enough capacity to run my winch, lights, HAM radios, computer, welder, and other accessories without worry. Even after stupidly leaving my lights on all day a couple times, I never had a problem restarting and going on my way. I have become extremely reliant on the fact that I can operate any and all of my electrical accessories without worry in any conditions That in and of itself made the project worth it. However, I knew from day one I would have to revisit this project because of other modifications.
Modifications and other solutions
I knew that at some point in my Jeep’s life, it would be getting a snorkel intake of some kind. We all know how horrible a position the YJ’s intake breather is in-even if you have a lift. There are more options out there than there used to be for Wrangler snorkels. Still, I went with the tried and true ARB Safari Snorkel. It is a OEM quality formed plastic intake that is correctly sized, lightweight, hugs the vehicle, and looks good to boot. There is a rumor that you can’t remove your doors with this snorkel. That is simply not true.
Well, what this has to do with dual batteries on a YJ is that the ARB Safari Snorkel kit requires you to relocate your windshield washer bottle to the inboard side of the factory battery tray. The Tomken tray I installed would not allow that due to its width. I am not willing to give up my extra electrical capacity nor my ability to see when driving, so I needed to get creative. Bottom line is that I had run out of space under the hood. If I wanted to keep my extra electrical capacity, it meant moving a battery elsewhere. I also did not have viable remote battery mount options in the YJ. What it came down to was that I would have to figure out how to keep two batteries in the factory location or lose my windshield washer. I first explored using a junkyard washer bottle that I could fit down in the inner fender below the battery tray as the solution. Finding a bottle that would fit and work proved too time consuming. I would return to this option at a later date.
The immediate workable option would be to use a Group 51 battery as the secondary/additional battery below the factory battery tray. Now, I needed to figure out a tray configuration to make this work. At first glance, there is plenty of room for both of my Group 34 batteries in the space on top of one another. Sure. If the heater motor didn’t stick out five inches into the space! To make a long and profane story short, I ended up hacking and welding an extra YJ battery tray I had on hand narrower to fit in the space below the factory tray and would fit the Group 51 Optima I picked up to replace the bigger Group 34 Optima. I would be ending up with two yellow top Optimas and a little over 90 Ah of stated reserve capacity. This is down about 20 Ah from my old setup, but still should be within the parameters I need. This includes overnight operation of an ARB 12 volt freezer/fridge taken on every overland adventure.
This odd solution worked for several years until I decided that it would be better to have that Tomken tray back in place and figure out how to install the washer bottle below the battery tray. The stacked system just didn't work out so well because to remove the batteries (or even to just disconnect them) meant removing not only the upper battery but also the battery tray to access the lower battery. During the process, primary cables would remain "hot" and easily cause damage. This got to be beyond tedious after wrenching on the Jeep a couple times.
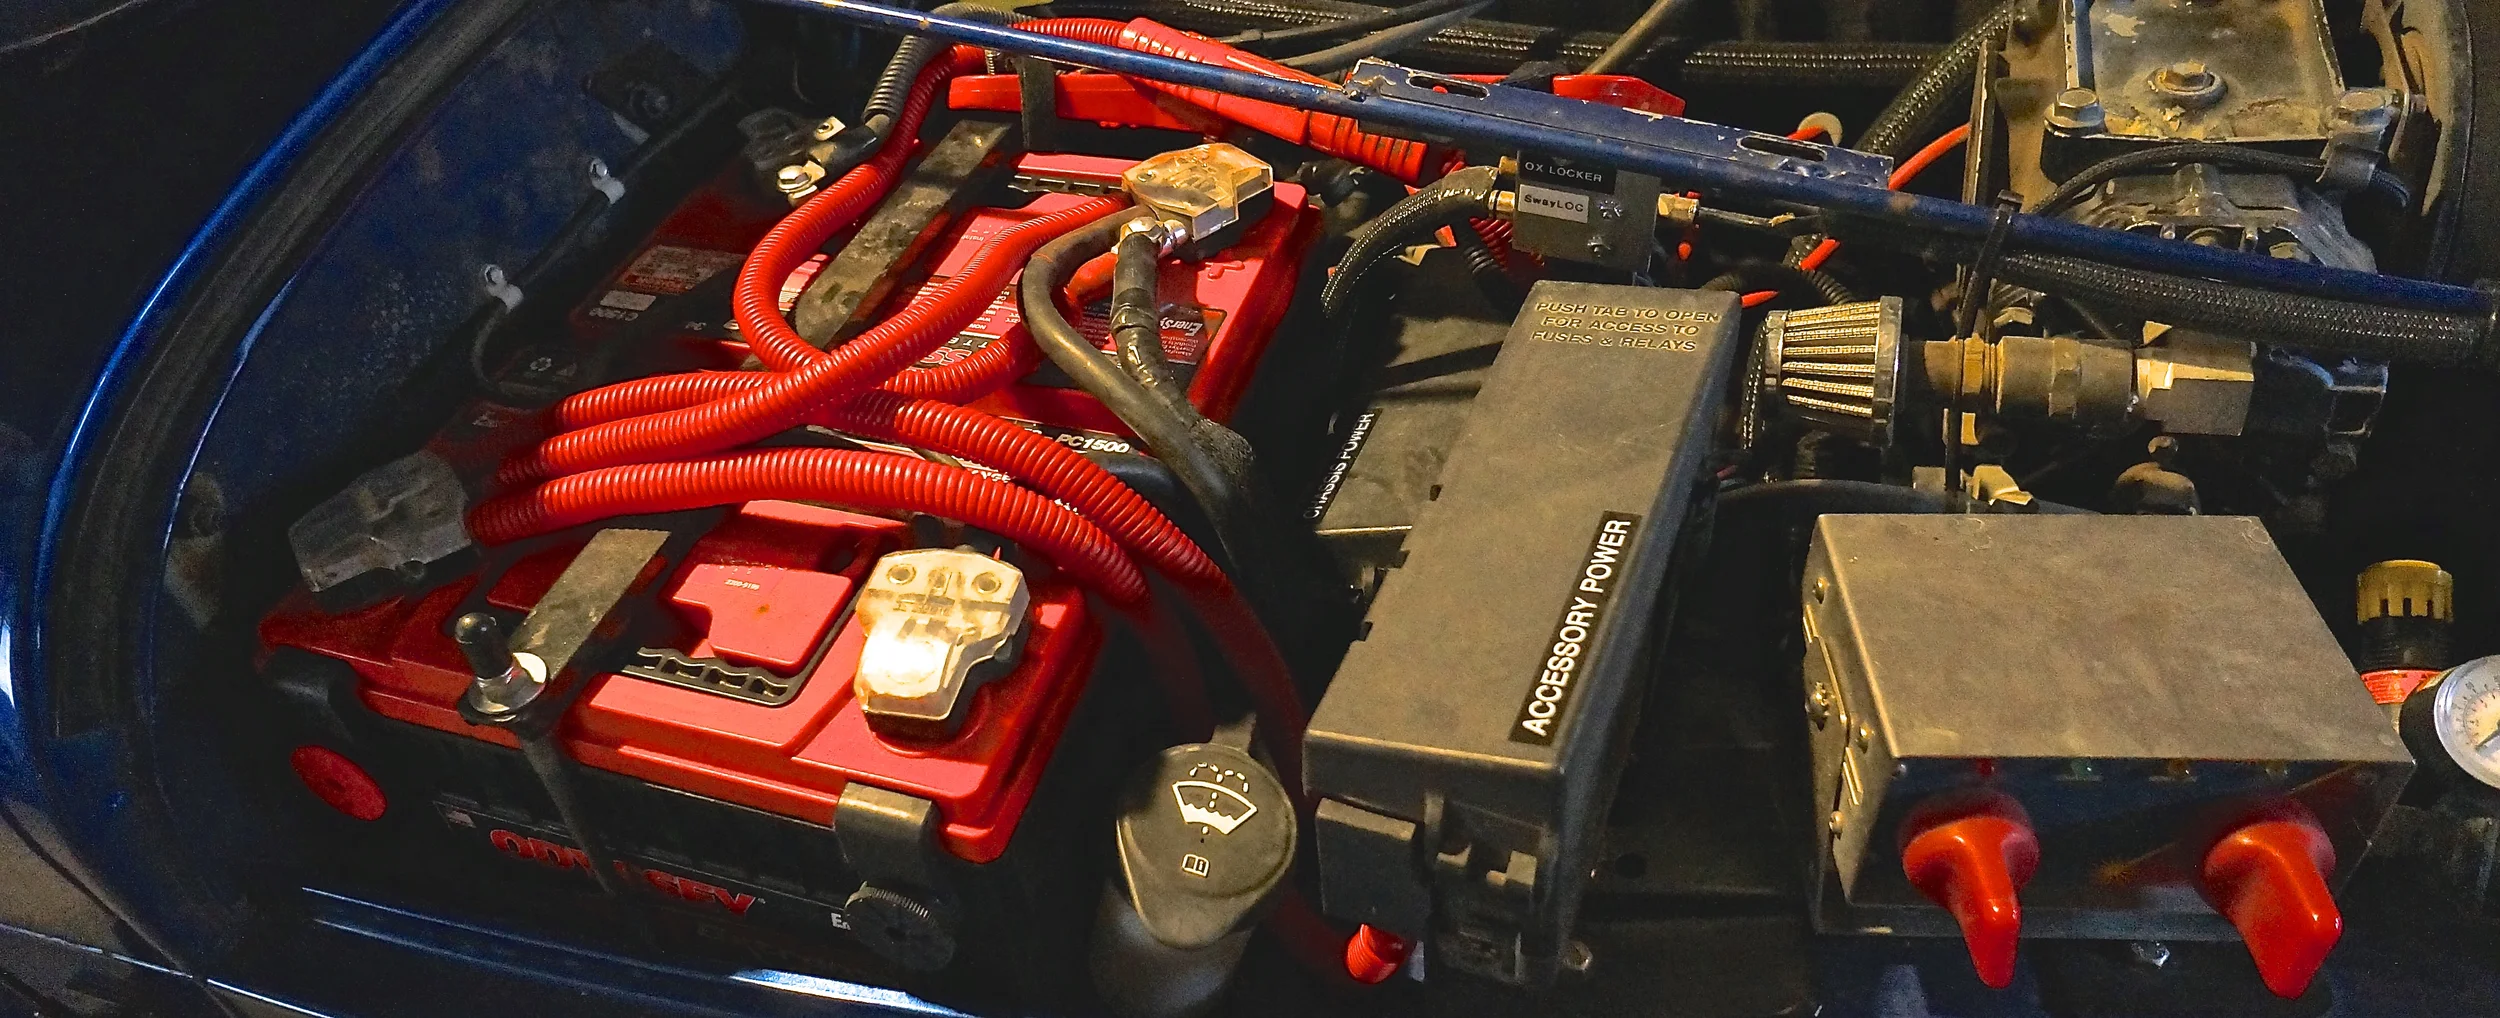
The final solution was to mount a washer bottle from a first generation Dodge Caravan in the void below the dual battery tray. This installation coincided with the installation of a refurbished factory hard top and steel doors on Big Blue. The hard top had a wash/wipe capability for the rear window I wanted to use. I installed two washer pumps in the junkyard bottle and bolted it in. The remote mount was made usable by splicing a spare radiator hose onto the top of the bottle and snaking it between the fender and dual battery tray. A Chevy Impala washer bottle fill neck was then installed in the end of the radiator hose. It now looks like a factory installation and works perfectly. Also, I got my dual Group 34 batteries back, and Odysseys to boot! Note: an aftermarket radiator catch bottle could also be used in this type of project if a suitable junkyard part can not be located.
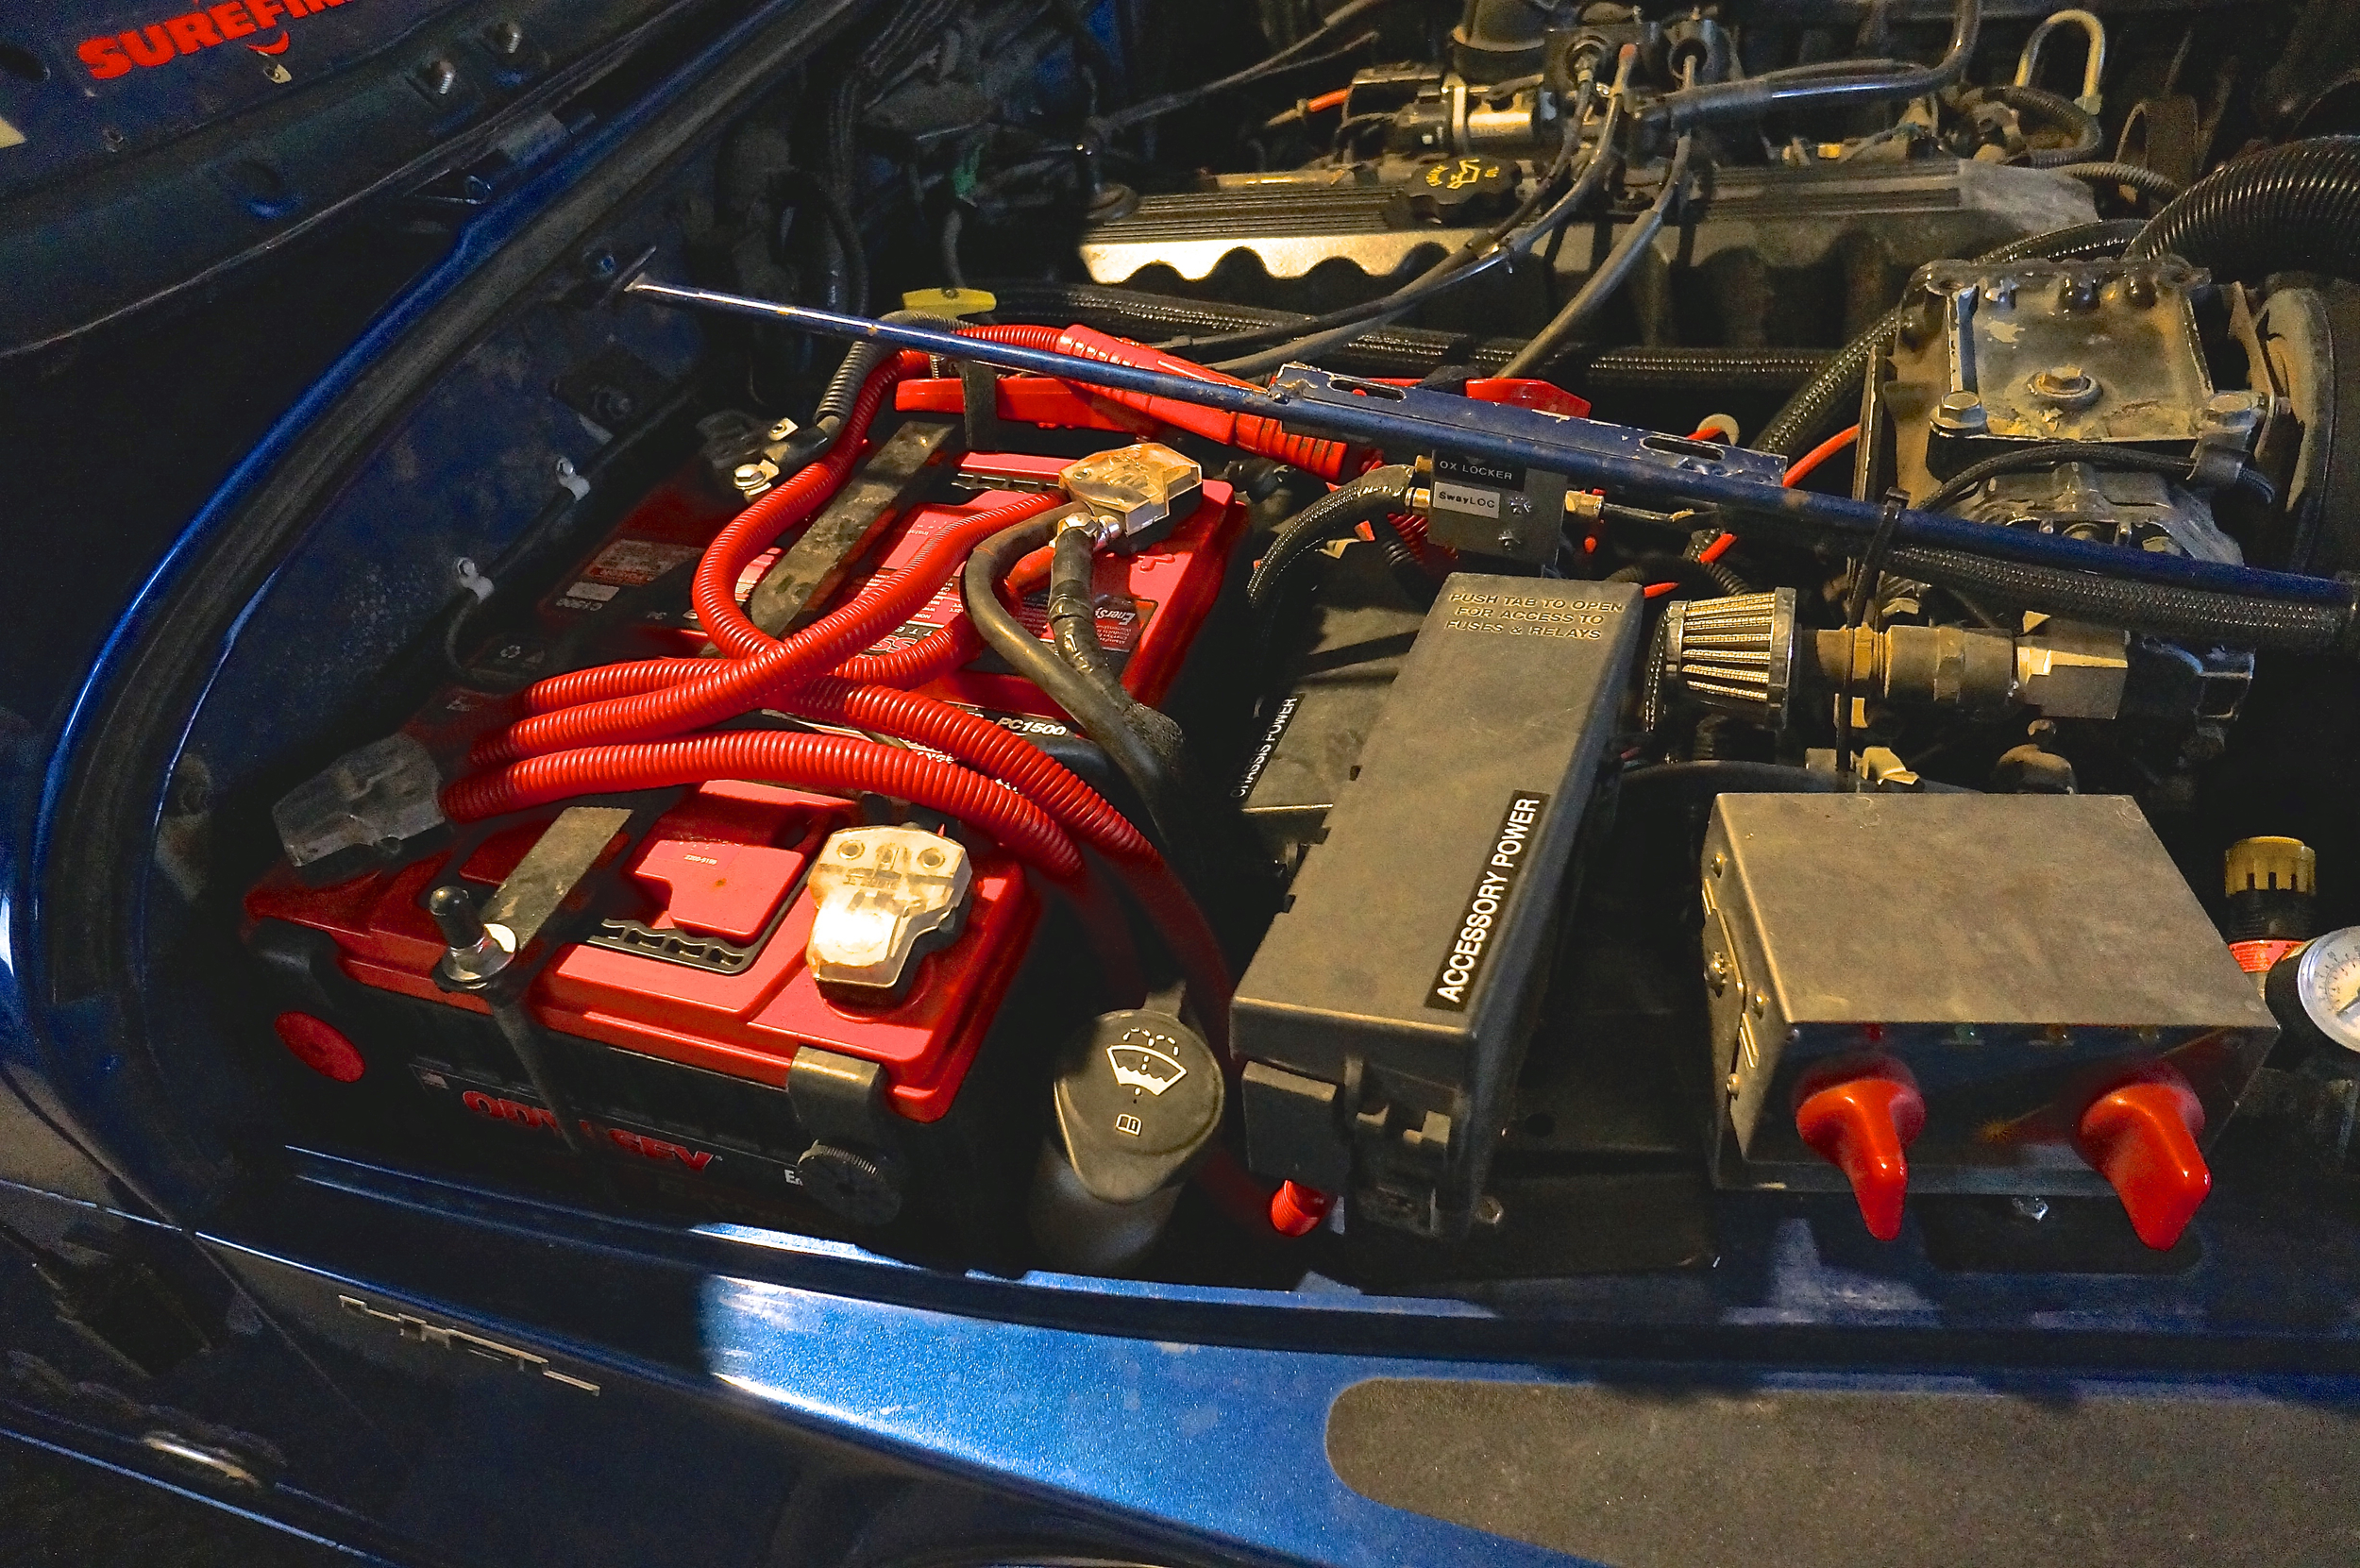
Final dual battery setup showing the additional fuse block and washer bottle fill. Mobi-Arc onboard welder far right.